
A Simple Guide to Install a Pre-Hung Interior Door
Installing an interior pre-hung door is not a difficult task, and most people can do it on their own, without hiring a professional. There are some important steps to follow to remove the existing door and replace it with the new pre-hung door.
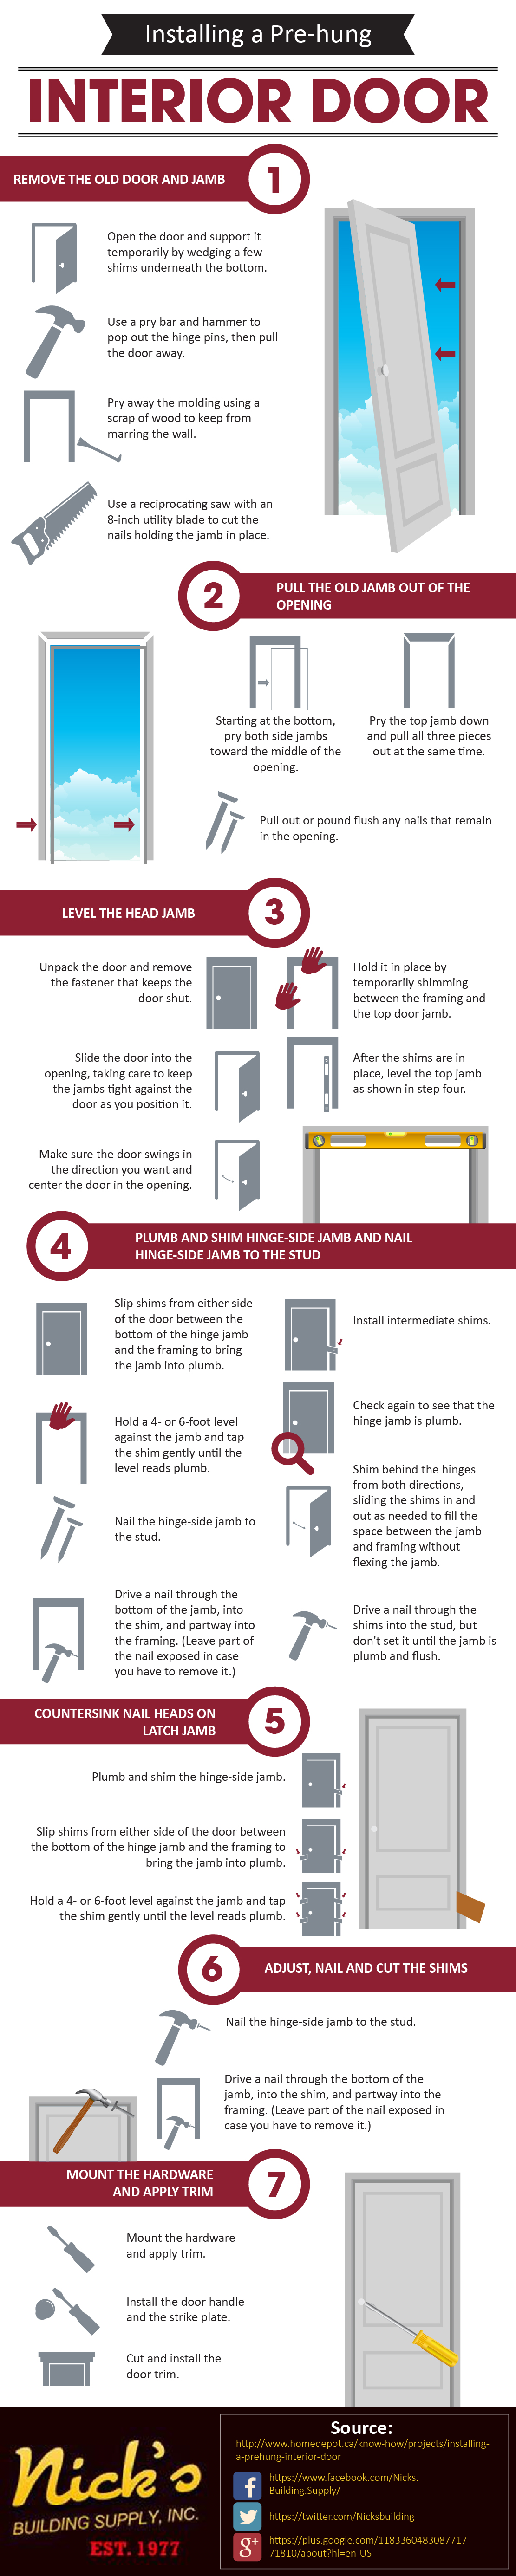
At Nick’s Building Supply, our pre-hung interior doors will be ready to install when they arrive. You can start by removing the old door at any time to make installation even faster.
Removing the Old Door
To remove the old door, you will need a hammer, pry bar, and a reciprocating saw with an 8-inch utility blade.
Start by opening the door to have access to the hinges. You can use small wedges under the door to hold it open and provide support to make removing the hinge pins easy. The pry bar and the hammer are used to pop the hinge pins, but be careful as the door is loose at this point and can fall.
Once the door is removed, use the pry bar to remove the existing molding. Once this is removed, you can either remove the nails manually or simply cut them using the reciprocating saw to remove the old door jamb.
Removing the Door Jamb
Start at the bottom of both sides of the door to loosen each jamb. Do the same for the top by prying down, but just to loosen. Then, pull all three out as a single piece. You may need to pry a bit more depending on how easily it is moving.
At this point, there will be exposed nail heads in the rough opening. These can be pulled out with the pry bar or pounded in with a hammer.
Installing the New Door
This is basically a reverse of the removal procedure, and you will need a four- or six-foot level for this process. In order, you will need to:
- Level the head jamb – place the door in the rough opening by sliding it into place. Hold it in place and make sure it is opening correctly and then shim between the frame and the top door jamb. Check to make sure it is leveled.
- Hinge side jamb – starting with the hinge side, place shims between the bottom of the jamb and the frame. Top the shim until the hinge frame is leveled, holding the door in place. Once leveled, place intermediate shims about halfway up the door, check it is plumb, shim behind the hinges and check for plumb and then nail through the shims into the stud.
- Latch jamb – using the same process, shim and plumb the latch side, checking to make sure it is plumb with each added shim. Nail the hinge-side in place and check again to be sure it is plumb. It is a good idea not to completely drive in the nail to allow for adjustments on all of the jambs.
- Nail – once both sides and the top jamb are leveled and plumb, nail the side and top jambs into place.
The last steps are to mount the hardware, including the door handle and the strike plate, and then to cut and install the trim. Your new door from Nick’s Building Supply will be fully installed and ready to use.